The Camera Simulation Setup dialog boxallows you to define the base parameters for your simulation. The Camera Simulation Setup dialog box is accessed by beginning a simulation. Go to Radiance—>Simulation—>Camera/Reference Grid/Reference Point
Then you will be prompted to select a Camera/Reference Grid/Reference Point <enter>. A dialog box will appear that asks for a scenario name. Enter a name which is unique for this project and click OK. Then, as prompted, select objects to be included in the simulation or type all. <enter>. The Camera Simulation Setup Box will then appear.
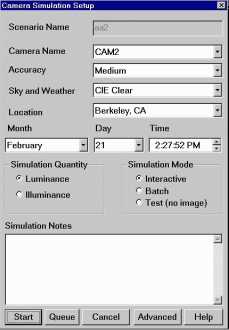
Figure 1. The Camera Simulation Setup Box
The Scenario Name box tells you the name of this particular scenario. It is the name previously entered in the Define Scenario Dialog Box. The scenario name is uneditable in the Camera Simulation Setup Box.
The camera name box allows you to choose the camera or view that you would like to simulate for this scenario. It automatically selects the camera selected previously in the process but others can be chosen from the pulldown menu. To create new saved views of your model in autocad, go to ViewNamed Views or type ddview. The dialog box that appears allows you to save the current view as a saved named view that can be accessed from the Camera Simulation Setup Box for simulation.
The accuracy box allows you to select the accuracy. For Version 1.02, only a Medium level of accuracy is available. However, this setting can be overwritten by changing the parameters under the "Advanced" dialog box.
The Sky and Weather box allow you to choose the sky conditions for your model. You can choose from CIE Clear, Overcast, Intermediate, and Uniform. Clear will have sharp patches of light and quite a bit of bright diffuse light. Overcast will have shadows, dimmer diffuse light, and some light specular highlights. Intermediate has sharp patches of light but the dim diffuse light of an overcast rendering. Uniform will have shadows and dimmer diffuse light than overcast with very faint specular highlights. For more information, consult the CIE Handbook.
To render with no sky or to turn the sky off, select a date and time that is at night.
The location box allows you to choose the location, more specifically the latitude and longitude, for the simulation. There are a few predefined locations. You can also define new locations by selecting "New…" from the pulldown menu. This will bring you to the Add New Location dialog box. For more on adding a new location see Add New Location.
The date, and time boxes allow you to define such factors for your scenario.
In the Camera Simulation Setup Box there is also a Simulation Quantity choice of Luminance or Illuminance. This setting determines what kind of information your image will contain. Luminance is the amount of light leaving a surface from a specific direction and includes the final surface reflectance. It closely resembles what the eye sees. Illuminance, alternatively, represents the total amount of light reaching a surface from all directions. Illuminance does not include the reflectance of the surface where the illuminance is being measured. The "illuminance" simulation quantity setting changes the Radiance computation so that the final surface reflectance is not included in the determination of the brightness of each pixel of the image.
The Simulation Mode box gives you choices of interactive, batch, or test. The interactive mode will allow you to experiment with exposure, ambient light and other settings in the interactive rendering program, rview. After finding ideal settings for your building in rview, then you can make these setting changes using the ADVANCED button on the Camera Simulation Setup Box. Then, instead of rendering in the interactive mode, render in batch mode. The Batch Mode will give more accurate simulation than in the rview Interactive Mode. The higher accuracy of a batch mode simulation will also increase the simulating time. After a batch mode simulation is finished, the image will not automatically appear. Click on DISPLAY/ANALYZE in the Simulation Manager to view the image. The Test Mode allows you to get a quick simple rendering of your building. This can be useful for quickly seeing the aiming of a camera. Like the Batch Mode, no image will appear until you click on DISPLAY/ANALYZE. No adjustments can be made to the image for it will appear in the image analyzer - Winimage, not rview.
After making any changes to the Camera Simulation SetUp Box you have several commands to choose from. START will begin the simulation. The QUEUE command is currently unavilable. CANCEL will close the Camera Simulation Setup Box and not save your changes. ADVANCED leads you to four dialog boxes.
Advanced Calculation Properties