Since you have created a wall with an opening, it is easy to now place a properly oriented surface inside this opening to accept the glazing attachment. The "right-hand rule" is used to determine the order in which the vertices of the glazing polygon should be created in order to properly orient the surface normal: Imagine placing your right hand against the wall with you thumb pointing into the space (the direction that the light travels). Your four other fingers now curl in the direction that the vertices should be created to obtain a properly oriented surface.
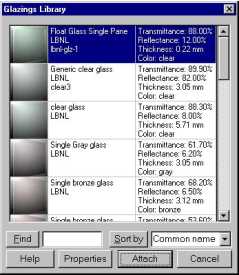
Figure 3. The Glazings Library dialog box.
The "Glazings Library" dialog box appears (Figure 3). Select "clear glass", click ATTACH. The glazing is now attached to the surface.
Note: For glazings, the surface normal is important when the glazing is treated "as a light source" for the rendering.
A glazing in Desktop Radiance is always modeled as a single surface. Having two panes of glass close together does not efficiently simulate a double-pane glazing. Having a box (3Dsolid) to model glazing with thickness is also incorrect. All glazings in the Desktop Radiance library are designed to be attached to infinitely thin, single paned surfaces, regardless of their real-life counterparts.